Karen Varcoe, Gresham OR kvarcoe@aol.com 503 267 6080

Saturday, March 31, 2012

Dotty for You!


When you place an order of $35 or more in products from the Spring/Summer 2012 Idea Book between April 17 and May 31, you may add the Dotty for You paper packet, valued at $19.95, for just $5. Dotty for You includes 24 specially designed, coordinating B&T Duos® sheets (2 each of 12 patterns) and an artwork idea insert to get your creative juices flowing.

Hostesses will receive a free Dotty for You paper packet when their Gathering sales total $400 or more (excluding tax, shipping/handling, and Operation Smile donations).
New Consultants who sign up between April 1 and May 31 (two full months!) will receive a free Dotty for You paper packet with their kit.

April Classes

Here's my line-up of April Classes:

Monday 4/9 at 6:00  Cards with Karen Gladstone
Tuesday 4/10  at 4:00 and 6:00 Cards with Karen Gresham
Thursday 4/12  at 4:00 and 6:00 Cards with Karen Gresham

We'll be using the Cruisin' papers to make three of our cards this month, including a birthday card, a You Are Amazing Card, and a Welcome Little One Card.    We're also using Dotty for You to make Fluttering By to Say Hi Card.  

Cards with Karen is $8 or FREE with a $15 order.  Please RSVP by e-mailing me or by clicking on the "join" button on my website.

Get Door Prize Tickets for:
  • RSVP two days ahead
  • bringing your own adhesive
  • ordering (2 tickets for a $50 order)
  • donating to Operation Smile
  • signing up for a workshop

Friday 4/20 at 6:00 Scrapbook Club.

Contact me if you'd like a Cruisin' Kit for this month!

Monday 4/23 at 6:00 Salem Cards with Karen and Scrapbooking.

Friday, March 23, 2012

While Supplies Last...

Here's a heads up on upcoming product retirement.   CTMH has let us know that the following items will be retiring in July, BUT may run out sooner:

The Spring/Summer 2012 Idea Book is the last idea book the following products will be featured:
• How-To Books
• Distressing Kit (full kit only)
• Exclusive Inks® Markers
• Cardstock Shade Packs
• 8 1/2" x 11" Cardstock Packs


Here are the 4 new papers from the Spring/Summer Idea Book that will be CONTINUED in the Autumn/Winter Book:

Pemberley
Stella
Victory
Florentine

So, the other papers in the Spring/Summer Idea Book will no longer be available after July:

Footloose
Superhero
Lucy
Cruisin'
Typeset
Roxie
Elemental
Sonoma


Why am I tell you this so EARLY??    I'm giving you a heads up because some of our wonderful How-to Books are already gone!   Reflections (layouts) and Originals (card patterns) are already sold out.   We currently still have:   Magic, Imagine, Cherish (all layout books) and Wishes (cards).

It was a bit of a shock to see that the how-to pattern books and markers are retiring, but I trust Jeanette and the CTMH team:  this means something better will be coming!    We'll just have to wait until Convention in mid-July to find out...

Wednesday, March 21, 2012

Love Your Layout - Studio j

Here's a fun tutorial on how to design a Studio J layout and add stitching.  Remember, you can always play with Studio J FREE.   There is no charge until you decide to buy a layout.   Ask me about getting a membership to get your layouts at a discount, along with free shipping and page protectors.

Sunday, March 11, 2012

March Stamp of the Month Card

Here's a little tutorial on the card I came up with to use with the March Stamp of the Month, Potential, and Florentine Papers.  My thanks to CTMH Consultant Susie Rostad, whose card inspired this card.

Take a 6"x12" piece of card stock - I used Colonial White.   Score it at 4 1/4" and 8 5/8".
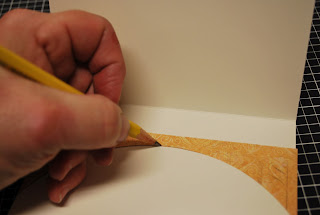
 Then, using some kind of circle cutter or anything round as a template, round off the short end of the card.
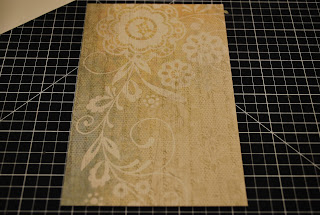
 Here's the gorgeous Florentine paper I'm going to use:  It's 5 1/2" x 3 1/2"
 Put it under the rounded end of your card base and trace.   Ouch, you can see my sore thumb and finger.   I got that from attacking Cousin It with a pair of scissors.  Cousin It is that overgrown Japanese Maple outside our front door, the one with the lousy haircut.   (I couldn't find the trimmers!)   Any of my customers who mention Cousin It to me will get a special prize.   See, there are rewards for reading my blog!  I put my pencil lines on the back of the paper I want to use.
 Trim and attach.
 Now take a 4 1/4 x 5 1/2 piece of twilight card stock and start random stamping.   I always start with the largest of my stamps that I'll be using.   Don't forget to go off the edges with your stamping to make it look more natural.   Rotate the stamps for variety.
 Now I've added the two smaller stamps.   These are all from Potential.   I used some 2nd generation stamping also.   It's bothering me - looks a little plain.   
 So, I'm adding a stamped image in cocoa.   This stamp is from the Florentine Workshop on the Go Stamp Set.  You will notice the cocoa images are rather light.   I think that stamp pad is my original from 5 years ago - you can imagine how much use it has gotten through the years in all my classes; it's getting a little tired.  But, the look is perfect for the effect I wanted:  I love it!
 Now for some of our very cool chocolate striped ribbon:
 It's getting beautiful!
 There's that same cocoa image from Florentine on the right.   The Happy Birthday stamp is from the new stamp set:  4 My Friend.  
 Now I've added a medalion type image, cut from my Cricut Art Philosophy cartridge (both the circle and the scallop behind it are AP images).  The scallop is from Brown Bag card stock. The stamp is also from Potential.   You can get Potential only during the month of March for $17.95 OR get it for $5 with a $50 order.

I inked all papers with Brown Bag ink and Twilight ink.  Brown Bag and Twilight look really nice together.  I also added a bitty antique copper brad to the center of the medalion
 Here are the three inks and the three stamp sets I used. 

 Hope you enjoyed this tutorial - come and make this card at March Cards with Karen this week!

Saturday, March 3, 2012

Guy Cards with Victory Papers

Here are the pictures from the Guy Card Workshop last week.   We had fun creating these masculine cards.  

First, the card box:   they are so fun to put together.   This one has a pewter badge button on the front, 4 Durable Pewter Studs on the top, and 2 photo corners from the Pewter Mini Medley on the front.   I also cut out the words GUY CARDS for the top.  The box and the papers are distressed with desert sand ink.

 Two of my favorite embellishments from the Spring/Summer Idea Book were used on our Guy Cards:  Tough Tags and Durables:
 We primarily used the Pure Adventure Stamp Set - I love this stamp set!
 Here's Card #1 Born Tough:   We used leathering (rubbing the stamp pad over a piece of card stock (in this case Olive on Olive) that is flat on a piece of scratch paper.   To get the hexagon-shaped papers, we went low-tech and traced around the Born Tough Tough Tag - simple.   The brads are antique copper.
 Card #2 Triumph:   Again, we did some leathering, and sponged edges, along with our stamping and embellishments.   Natural Hemp, shown here, was used on a few of our cards.
 Card #3:  Adventure is a State of Mind:   Stamped on an Art Philosophy Cricut Shape.   I love my AP cartridge!  We used the elk, duck and fish stamps too!  The plaid paper featured here is one of my favorite prints from this Idea Book.
 Card #4  Incredible:  pretty much lifted from the Idea Book - that's what that book's for!  We used the spray pen on the colonial white circle for a different look.
 Card #5 Limited Edition:   No stamping on this card - easy peasy!
 Here's a close-up of this Tough Tag:   I'll have to send this card to Scott - his birthday is June 23rd!  They were off by one year though!
 Card #6 Genuine Quality:   We used a zip strip (the star paper) off of one of the Victory papers - love those zip strips.   We used Just a Number Stamp Set - it has some great sentiments.
 Here's the inside:   Boy, isn't that the truth!
 Card #7:  This is the bottom right quarter of one of the papers - pretty neat - we just added copper brads.
 Card #8 You're a Star:   This card is taken from the Workshop on the Go Kit instructions.   There are some new card patterns, and this is one - instructions are on my website.  We made a slit on the folded edge of the card base so we could wrap the hemp around the front of the card.  A Dimensional Element Star and Durable complete this card.
 Card #9 Pure Adventure Elk Card:  We used stars again, along with some stamping for this card.
 Card #10 Unmatched Style:  Here we go with another zip strip, a bit of stamping and another Tough Tag - fun!